Summary
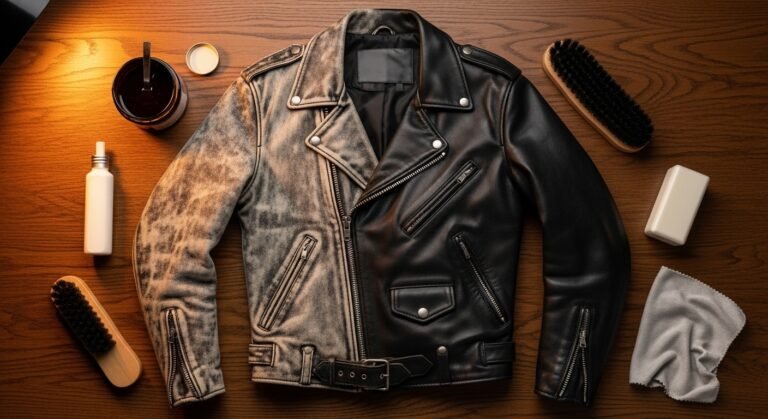
Leather jackets are timeless wardrobe investments, but even the finest full-grain leather is vulnerable to surface damage. Small scratches, scuffs, and micro-abrasions can appear from everyday wear — a brush against a zipper, a snag on a wall, or the friction of a bag strap. Fortunately, most minor leather scratches are entirely repairable at home using the right techniques, tools, and leather care products. This comprehensive guide walks you through everything you need to know: understanding leather scratch types, identifying your leather finish, choosing the correct repair method, and applying professional-grade restoration techniques. Whether you own a classic black biker jacket or a premium trucker silhouette, learning to repair and maintain your leather is the single most effective way to extend its lifespan and preserve its natural beauty.
Table of Content
- Introduction — Why Leather Scratches Happen
- Understanding Leather Types and Their Scratch Behavior
- Identifying the Depth and Type of Scratch
- Tools and Products You’ll Need
- How to Repair Light Surface Scratches (The Heat Method)
- How to Repair Medium Scratches Using Leather Conditioner
- How to Repair Deep Scratches with Leather Filler or Repair Kits
- Matching Leather Color After Repair
- Finishing and Sealing the Repaired Area
- Post-Repair Leather Care and Conditioning
- When to Call a Professional Leather Restorer
- How to Prevent Future Scratches
- FAQs
- Conclusion
Introduction: Why Leather Scratches Happen
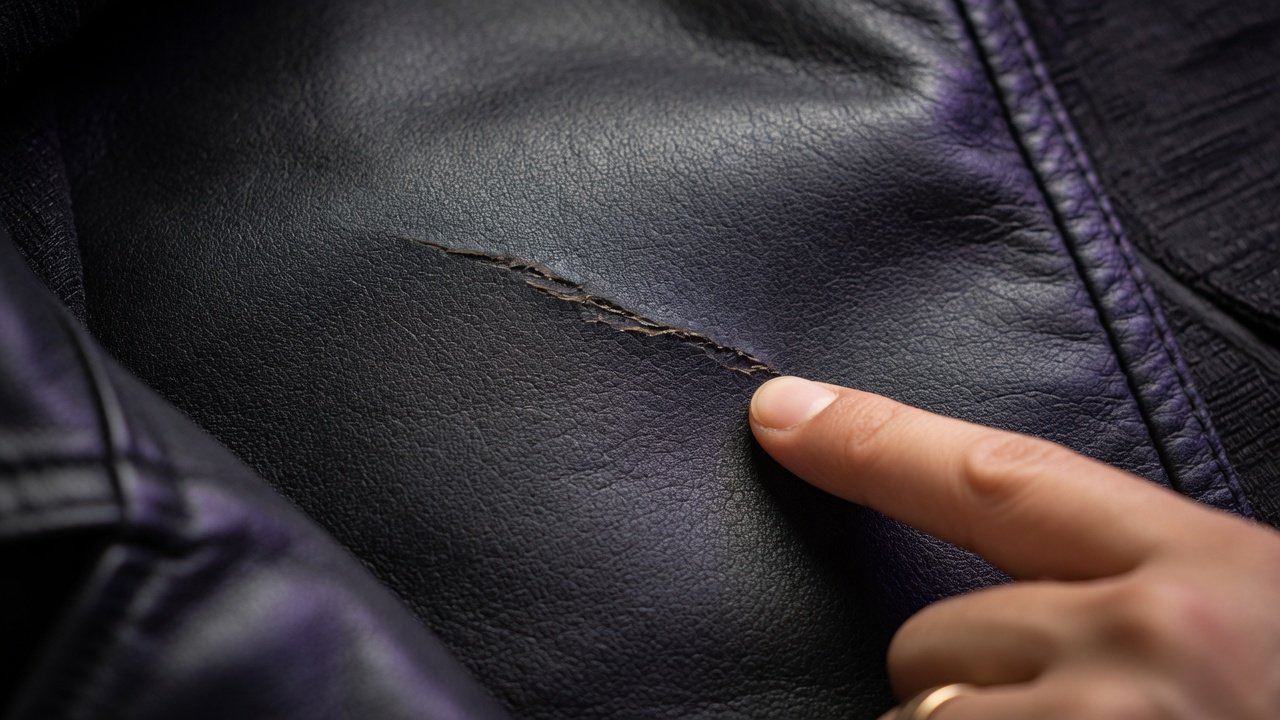
Leather is a natural, organic material — and that is both its greatest charm and its most practical vulnerability. Unlike synthetic alternatives, genuine leather has a fibrous structure that can be disrupted by friction, sharp contact, or abrasive force. When these disruptions occur near the surface, what results is what we commonly call a scratch.
Small scratches on leather jackets happen for many reasons: rubbing against rough walls, contact with keys or belt buckles, pet claws, or even the friction of a backpack strap over time. The good news is that leather has a remarkable property — it can often be “persuaded” back into alignment. The natural oils and fibers in the leather can be rehydrated and manipulated, making most small scratches invisible with the right care.
Understanding this foundational concept — that leather is a living, breathable surface capable of restoration — is the starting point for every effective repair.
Understanding Leather Types and Their Scratch Behavior
Before attempting any repair, it is critical to identify what type of leather your jacket is made from. Different leather finishes respond very differently to the same repair method.
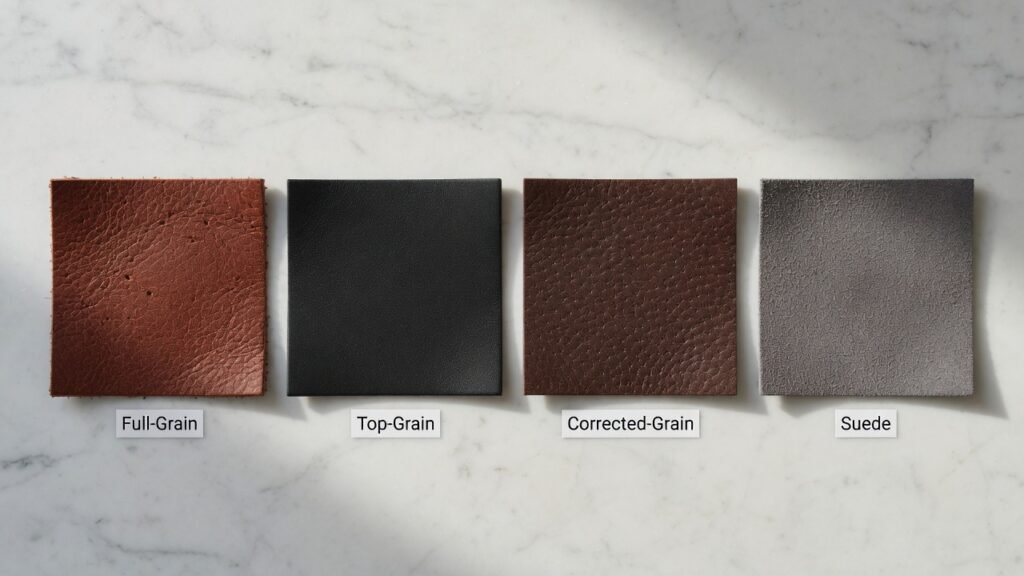
Full-Grain Leather
Full-grain leather is the highest quality leather, made from the outermost layer of the hide with the natural grain intact. It develops a rich patina over time and is relatively resilient to scratches. Minor scratches on full-grain leather can often be buffed out using only your fingertip or a leather conditioner.
Top-Grain Leather
Top-grain leather has been lightly sanded to remove imperfections and then coated with a finish. It is the most common leather used in mid-range and premium jackets. Scratches on top-grain leather require a slightly more methodical approach because the protective coating may need to be addressed alongside the scratch itself.
Corrected-Grain Leather
Corrected-grain leather is heavily processed with an artificial finish applied on top. While this makes it more uniform in appearance, it is more susceptible to surface scratches that reveal the underlying texture beneath the coating.
Suede and Nubuck
Suede and nubuck are napped leathers with a soft, velvety surface. These require completely different tools (such as suede erasers and nubuck blocks) and should never be treated with liquid conditioners unless specifically formulated for that leather type.
Bonded Leather
Bonded leather is a reconstituted product made from leather scraps. It behaves more like a synthetic and peels rather than scratches cleanly. Repair of bonded leather is limited and often temporary.
Identifying the Depth and Type of Scratch
Not all scratches are equal. Leather professionals classify surface damage into three primary categories, and the repair strategy differs significantly across each:
Level 1: Surface Scuffs and Light Scratches
These are shallow marks that have disturbed the finish or the topmost grain layer without breaking through the leather itself. They often appear as a lighter-colored streak or a slightly raised texture on the surface. These are the easiest to repair — often requiring nothing more than fingertip heat, a leather conditioner, or a soft cloth.
Level 2: Medium Scratches
Medium scratches penetrate slightly deeper into the leather finish and may show a white or raw leather color at the scratch site. These require a more intentional approach: a quality leather conditioner, possibly a leather repair balm, and some light buffing.
Level 3: Deep Gouges
Deep scratches that cut into the dermis layer of the leather — showing raw, frayed fibers — require a leather filler compound. These are the most involved repairs and may require color-matching dye and a sealing finish coat.
For the purpose of this guide, we focus primarily on Levels 1 and 2, which represent the vast majority of everyday leather jacket damage.
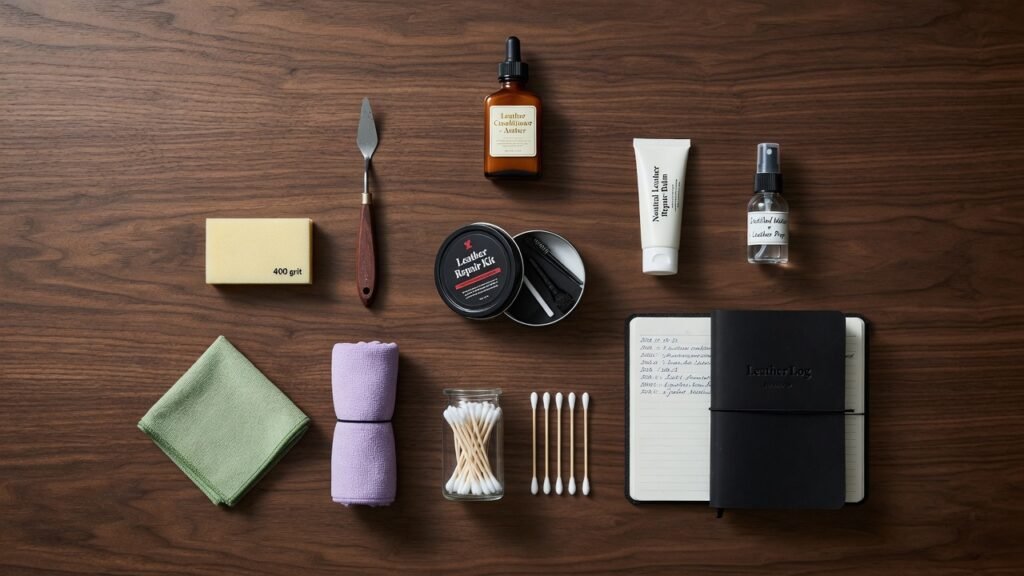
Tools and Products You’ll Need
Assembling the right toolkit before you start is essential. Using the wrong product on leather can cause further damage, discoloration, or surface breakdown. Here is what you need for a complete leather scratch repair kit:
For Light Scratches:
- Clean microfiber cloth
- Leather conditioner (e.g., Leather Honey, Bickmore Bick 4)
- Leather balm or cream
For Medium Scratches:
- All of the above, plus:
- Leather repair balm or wax filler
- Fine-grit sanding sponge (optional, 1500+ grit)
- Soft-bristle brush
For Deep Scratches:
- Leather filler compound (e.g., Rub ‘n Restore, Leather Magic)
- Color-matched leather dye or pigment
- Palette knife or spatula
- Sponge or brush applicator
- Leather finish sealer (matte or gloss, matching original finish)
General Tools for All Repairs:
- Rubbing alcohol (isopropyl, 70%) for surface cleaning
- Cotton swabs
- Hairdryer (for the heat method)
- Clean, lint-free cloths
- Good lighting
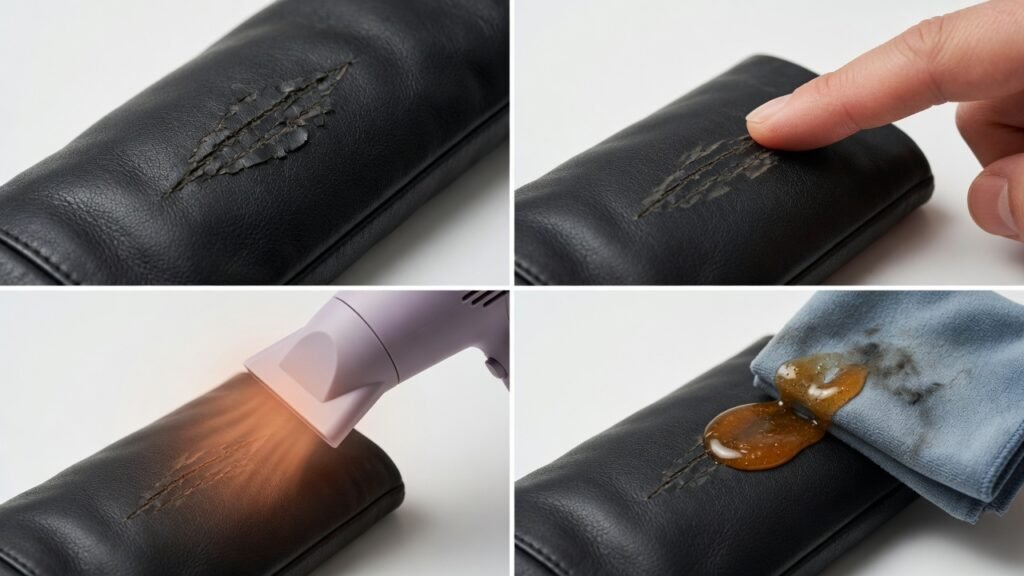
How to Repair Light Surface Scratches (The Heat and Conditioner Method)
This is the most accessible repair technique, and it works remarkably well on full-grain and top-grain leather with minor surface scuffs.
Step 1: Clean the Surface
Before touching the scratch, clean the surrounding area with a soft cloth lightly dampened with water or a diluted leather cleaner. Remove any dirt, dust, or oils that could interfere with the repair. Allow the area to dry completely.
Step 2: Apply Gentle Heat
Using your clean fingertip, rub the scratch in circular motions. The natural body heat from your finger, combined with the friction, can cause the leather fibers to relax and realign. This technique works particularly well for very superficial scuffs.
For slightly more stubborn scratches, use a hairdryer on its lowest setting, held at least 8–10 inches away from the leather. Warm (not hot) air helps soften the leather fibers, making them more pliable and easier to manipulate. Always keep the dryer moving — never hold heat in one spot for more than 2–3 seconds.
Step 3: Work the Leather with Your Finger
While the leather is slightly warm, use your fingertip or the back of a smooth spoon to gently rub the scratched area in circular and linear strokes. The combination of heat and pressure encourages the leather grain to move back into its natural position.
Step 4: Apply Leather Conditioner
Apply a small amount of premium leather conditioner to a soft microfiber cloth and work it into the scratch and surrounding area using gentle circular motions. The conditioner nourishes the leather fibers, restores oils, and causes the surface to swell slightly — often making light scratches virtually disappear.
Allow the conditioner to absorb for 10–15 minutes, then buff gently with a clean, dry cloth.
How to Repair Medium Scratches Using Leather Conditioner and Balm
Medium scratches require more patience and product layering.
Step 1: Clean and Prepare
Clean the area thoroughly using a cotton swab dipped lightly in isopropyl alcohol. This removes grease, wax, and old conditioner residue that might prevent good adhesion. Do not saturate — just a light wipe. Allow to dry for 5 minutes.
Step 2: Apply Leather Repair Balm
Leather repair balms are thicker than standard conditioners and contain filler compounds that help fill in the disrupted grain. Using a cotton swab or your fingertip, apply a small dot of the balm directly into the scratch. Work it in gently with a circular motion.
Step 3: Smooth and Blend
Using a damp microfiber cloth, gently blend the balm outward from the scratch into the surrounding leather. This feathering technique prevents a noticeable patch effect. Let it dry for 5–10 minutes.
Step 4: Repeat if Necessary
Medium scratches often require 2–3 light application layers rather than one heavy application. Each layer fills the scratch incrementally. Allow each layer to fully dry before applying the next.
Step 5: Condition the Full Panel
Once the scratch has been addressed, apply a leather conditioner to the entire jacket panel (not just the scratch site) to ensure an even, consistent finish. This prevents visible dry or shiny patches around the repair area.
How to Repair Deep Scratches with Leather Filler or Repair Kits
Deep gouges require a structural repair approach before any conditioning or coloring can be effective.
Step 1: Clean Thoroughly
Use isopropyl alcohol to clean a 2-inch radius around the damaged area. Remove all oils and residue.
Step 2: Apply Leather Filler
Using a palette knife or your fingertip, apply a small amount of flexible leather filler compound directly into the gouge. Smooth it flat using the edge of the palette knife, filling the scratch completely without overfilling. The filler should sit flush with — not above — the surrounding leather surface.
Step 3: Allow to Cure
Most leather fillers require 20–30 minutes of drying time. Check the product instructions. Do not attempt to accelerate drying with heat at this stage.
Step 4: Sand Lightly (if needed)
If the dried filler is slightly raised, use a 1500–2000 grit sanding sponge to feather it flush with the surrounding leather. Use extremely light pressure and check frequently. Wipe away any dust with a clean cloth.
Step 5: Apply Color
This is the most technically demanding step. Using a leather dye or pigment that closely matches your jacket color, apply a thin layer over the repaired area using a sponge applicator or fine brush. Work outward in circular motions to blend into the surrounding leather. Allow to dry. Apply additional layers until the color is seamlessly matched.
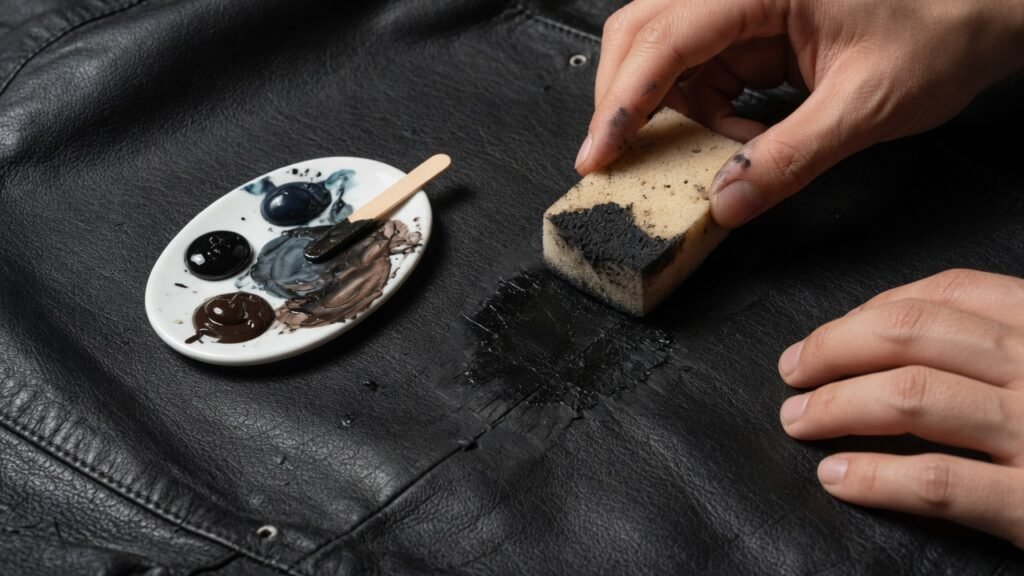
Matching Leather Color After Repair
Color-matching is arguably the most nuanced skill in leather repair. Even a perfectly filled scratch can look obvious if the color is even slightly off.
For black leather jackets — the most common choice — this is relatively straightforward, as black leather dyes are widely available and consistent. However, for brown, tan, cognac, or oxblood leather, matching can be tricky.
Tips for accurate color matching:
- Always test the dye on a hidden area first (inside hem, under collar).
- Start with a slightly lighter shade than you think you need — it’s easier to add depth than to remove it.
- Mix two shades of dye to hit the exact hue when working with specialty colors.
- Compare under both natural daylight and artificial light before finalizing.
- Many professional leather repair kits include a color mixing guide and multiple pigments specifically for this purpose.
Finishing and Sealing the Repaired Area
After any color application, the repair must be sealed to protect it from future wear, moisture, and friction. Leather finish sealers are available in matte, semi-gloss, and gloss formulations. Match the sealer sheen to your jacket’s existing finish — typically matte for vintage-style jackets and semi-gloss for modern smooth leather.
Apply the sealer in a thin, even coat using a sponge applicator. Allow to dry completely (30–60 minutes), then gently buff with a dry microfiber cloth. For heavy-use areas like elbows or shoulders, apply a second sealer coat for durability.
Post-Repair Leather Care and Conditioning
After repair, the leather in and around the treated area has been worked quite thoroughly. Replenishing its moisture content is essential to prevent stiffness, cracking, and further damage.
Apply a generous but not excessive amount of a high-quality leather conditioner across the full jacket surface — not just the repaired area. Work it in using circular motions and allow it to absorb fully. This step also helps “unify” the texture across the entire jacket, making the repaired area less distinguishable from the surrounding leather.
For long-term maintenance, conditioner should be applied every 3–6 months, or more frequently if the jacket is exposed to harsh conditions such as rain, cold weather, or heavy daily use.
To learn more about protecting your leather investment from environmental stress, read our detailed guide on Prevent Leather Jacket Cracking — covering everything from humidity management to storage best practices.
When to Call a Professional Leather Restorer
While the vast majority of small scratches are DIY-repairable, there are situations where professional intervention is the smarter choice:
- The scratch is in a highly visible, structural area (center chest, sleeve front), and the color match is critical
- The leather is vintage, exotic (ostrich, crocodile), or extremely high-value
- Multiple overlapping scratches have created a complex texture disruption
- Previous DIY repair attempts have left uneven texture or color
- The jacket has sentimental or significant monetary value that warrants expert care
Professional leather restoration services can typically handle color-matched repairs, re-dyeing, and full-surface refinishing to an invisible standard. Costs vary widely — from $30 for minor touch-ups to $200+ for complex restoration — but for a premium jacket, the investment is often well worth it.
How to Prevent Future Scratches
Prevention is always more effective than repair. Incorporate these habits into your leather care routine to minimize the risk of future scratching:
Storage: Always hang your leather jacket on a padded hanger in a breathable garment bag. Avoid cramming it between other items in a tight closet, as sustained pressure against textured surfaces causes micro-abrasions.
Regular Conditioning: Well-conditioned leather is more supple and resilient. A hydrated leather surface absorbs minor impacts more effectively than dry, brittle leather.
Avoid Rough Surfaces: Be mindful of contact with brick walls, metal fixtures, rough wood, or coarse fabric. The most common source of everyday leather jacket scratches is environmental contact during wear.
Use a Leather Protector Spray: A leather protector spray creates an invisible barrier on the surface that repels water, dirt, and reduces friction. Apply it 2–3 times per year.
Be Careful with Accessories: Bag straps, keys, belt buckles, and watches are among the most common culprits for leather jacket scratches. Consider how these items contact your jacket during daily use.
For those interested in owning a premium leather piece that combines resilience with timeless style, the Jaketra Pioneer Luxury Black Leather Trucker Jacket is crafted from full-grain leather specifically selected for its natural durability and scratch-resistance characteristics — an excellent choice for both everyday wear and long-term investment.
According to the Leather Industries of America, proper and consistent conditioning is the single most effective method for maintaining the integrity and appearance of genuine leather products over time.
Frequently Asked Questions
Can toothpaste remove scratches from leather? Toothpaste is mildly abrasive and is sometimes suggested as a DIY method. While it may temporarily minimize very superficial scuffs on light-colored leather, it is generally not recommended as it can dry out the leather, disrupt the finish, and cause long-term damage. Stick to products specifically formulated for leather repair.
Will olive oil fix leather scratches? Olive oil can temporarily mask a scratch by darkening the leather and lubricating the fibers. However, it does not actually repair the scratch, it can go rancid inside the leather over time causing odor and degradation, and it may attract mold in humid climates. Use a purpose-made leather conditioner instead.
How do I fix a cat scratch on my leather jacket? Cat scratches often go slightly deeper than typical surface scuffs and may have lifted or curled the leather surface. If the fibers are raised, gently flatten them with the back of a warm spoon before applying conditioner. If the scratch is deeper, follow the medium-to-deep scratch repair protocol outlined earlier in this guide.
Does petroleum jelly repair leather scratches? Petroleum jelly (Vaseline) is sometimes used as a temporary leather conditioner and can help minimize the appearance of light scratches. However, it leaves a greasy residue, attracts dust, and is not a lasting solution. It should not replace a proper leather conditioner.
How long does a leather scratch repair last? A well-executed repair using quality leather filler, dye, and sealer on a properly conditioned jacket should last several years under normal wear conditions. The longevity of the repair depends heavily on the quality of products used, the technique applied, and how consistently the jacket is maintained afterward.
Conclusion
Small scratches on a leather jacket are a near-inevitable consequence of wearing and enjoying one of fashion’s most enduring garments. But they are rarely cause for distress. With the right understanding of your leather type, the correct tools, and a methodical approach, the vast majority of surface scratches can be repaired at home to a professional standard.
The key is to act early — a fresh scratch is always easier to repair than one that has been ignored, dried out, or worsened by improper handling. Pair your repair skills with a consistent maintenance routine — regular conditioning, proper storage, and preventive protection — and your leather jacket will not only survive everyday wear but develop that rich, characterful patina that makes fine leather more beautiful with age.
Your leather jacket is a long-term companion. Treat it accordingly.